
Maps & Geolocation Add-on
Maps and geolocation conveniently help users learn where a point of interest is, discover nearby places, and provide personalization based on their location. And to suit your business needs, Devless, no-code app builder, allows you to include static or dynamic maps depending on how fancy you want to get.
The easy step-by-step instructions below will give you a quick start and offer explanations and screenshots so you’ll know exactly what to expect for each feature.
Getting Started
To begin, we enable the “Maps & Geolocation” add-on, which allows you to add a new “Location” resource type to your app and display maps.
- Login to Devless Admin.
- Click the Add-ons page in the left menu.
- Click the ‘Maps & Geolocation’ tile to open it.
- Click the ENABLE button.
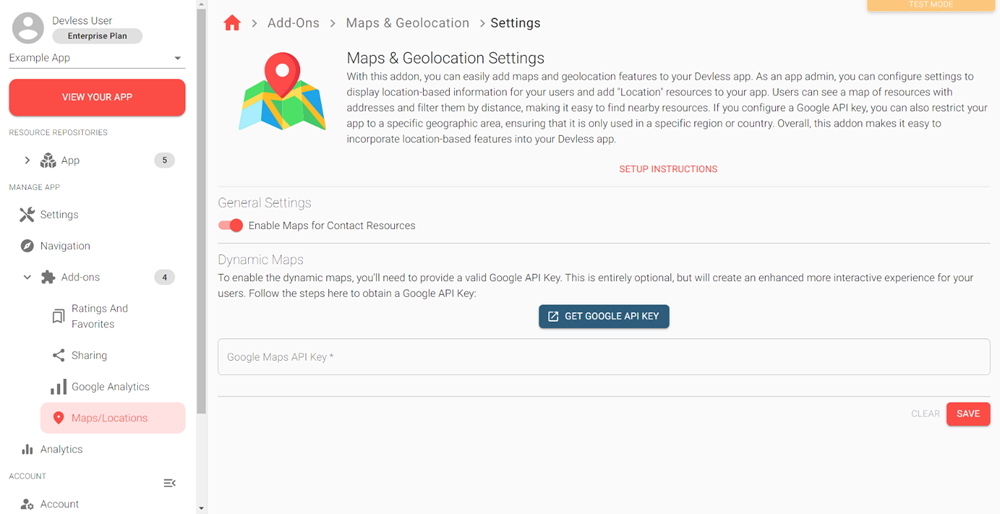
- Click the MAPS & GEOLOCATION SETTINGS button.
NOTE: Enabling the Maps feature adds a “Maps/Location” settings page to the left menu of Devless Admin. If you don’t see it, expand the Add-ons menu item. This will be the most convenient way to access its settings in the future.
Configuring Your Devless App
Now that it’s enabled, we’ll explain the differences between static and dynamic maps so you can decide which serves your users best. Then, we’ll show you how to configure each.
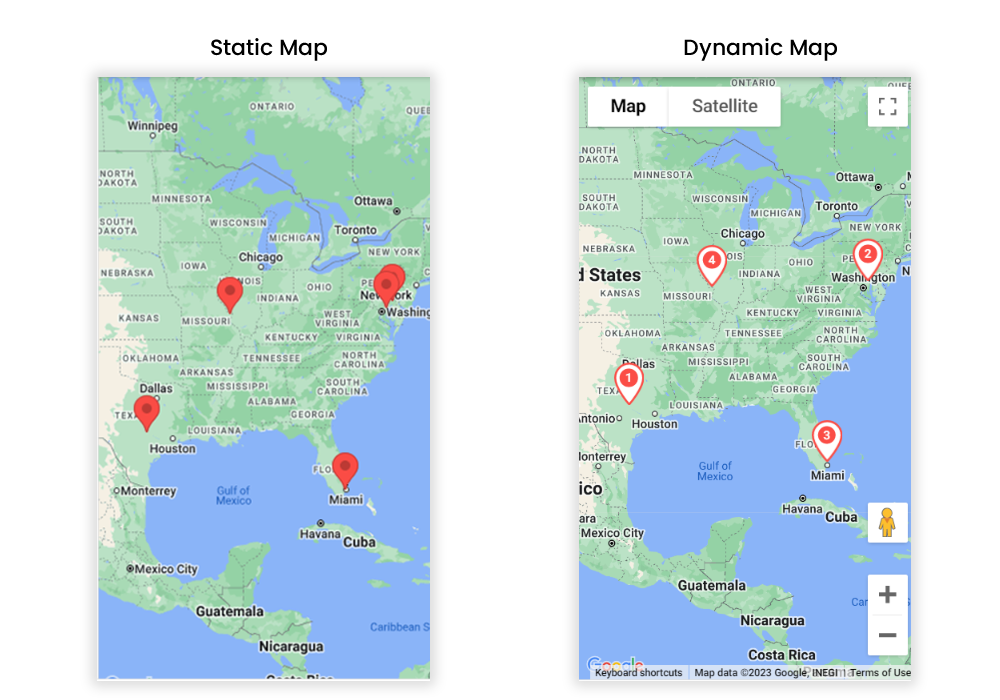
Static maps
Static maps are the quickest to implement and display a non-interactive image. If you already have contact resources with addresses listed in your app, you can go ahead and “View Your App” to look at the results!
At the folder level, it displays a parent view which pins all contacts onto a single static map like this:
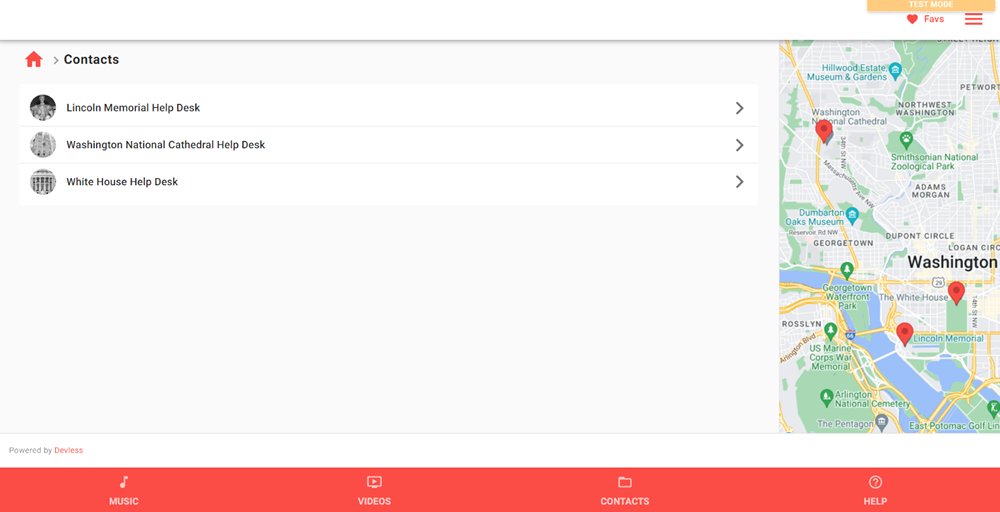
At the resource level, you can also display static maps for individual contacts, but we’ll need to turn on this feature in settings:
- In Devless Admin, navigate to the Maps/Location page in the left menu.
- Toggle on “Enable Maps for Contact Resources.”
- Click SAVE.
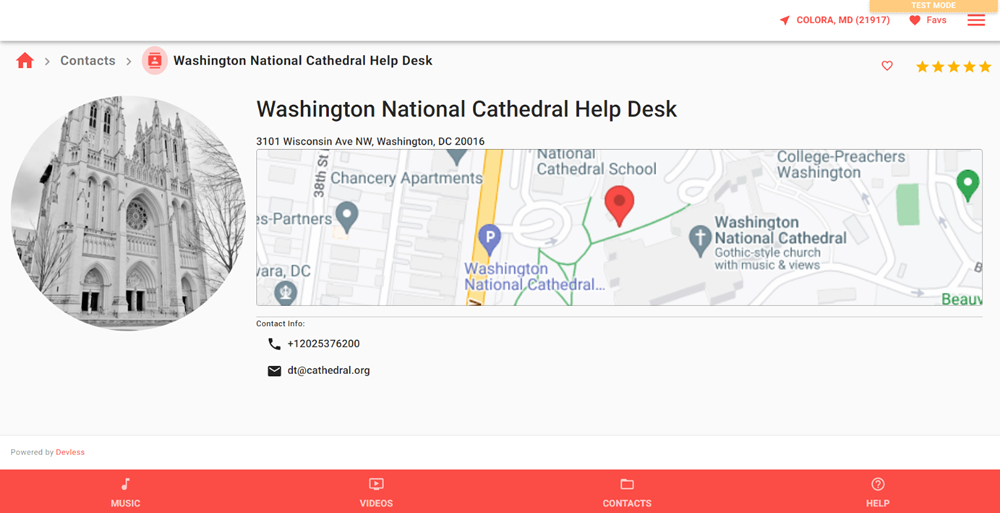
Now, when users select a particular contact from your list to view its details, a static map appears like so:
As mentioned, enabling this add-on also gives you access to a new resource type called “Location.” This resource type lets you get creative by linking other resources to a map. When adding a Location resource, use the search field below the address to find the resource you want to link.
Dynamic maps
To enable the dynamic maps in Devless Admin, you’ll need to provide a valid Google API Key. This is optional but will create an enhanced, more interactive user experience.
Use our quick link on the settings page to get a Google API Key

While on the Google Maps Platform, enable the “Places API” features for your provided API key if you use geolocation (addressed in the next section).
Once done, paste your Google Maps API Key into Devless Admin, and the settings page will expand with additional fields to customize your dynamic maps.
NOTE: Any resources with an address made prior to setting up the Google API key may not have all the location information calculated. You might need to open any resources with addresses and re-save them after setting up your Google API key.
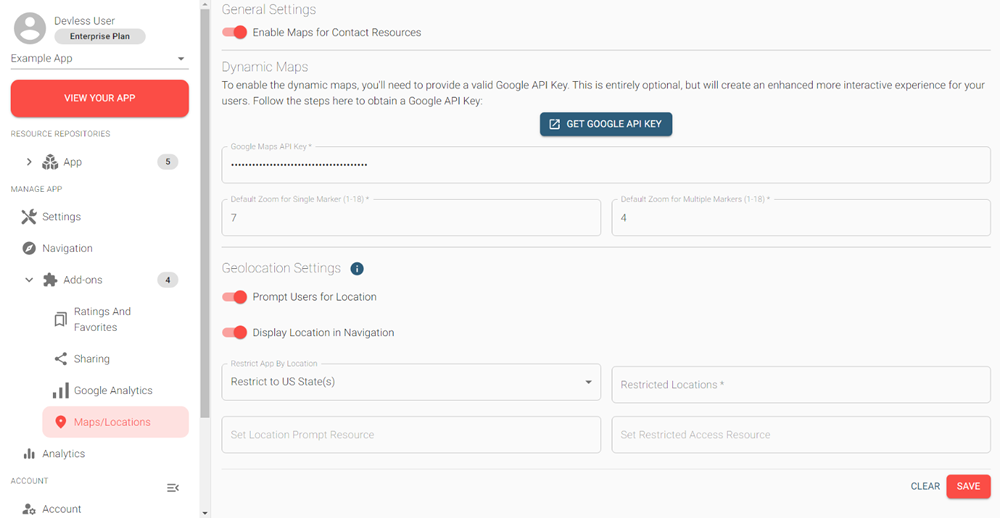
Now, you can set default values for the zoom fields (1-18). One is the max you can zoom out, and 18 is the max you can zoom in. You may need to go back and forth between the Devless Admin and the Client App to get it right for your particular map. Remember to SAVE your settings to reflect correctly in the app each time. Then, refresh the client app’s page so that it updates as well.
So far, you’ve set up beautiful dynamic maps! However, you can take it up a notch by offering geolocation.
Geolocation settings
App geolocation identifies a user’s location to offer personalized services, like navigation, localized content, and interactions. Users will receive a prompt to allow the app to detect their location; however, they can manually provide their location if preferred. This ensures a tailored experience based on their whereabouts while considering their privacy preferences.
The first two toggles in this section accomplish this:
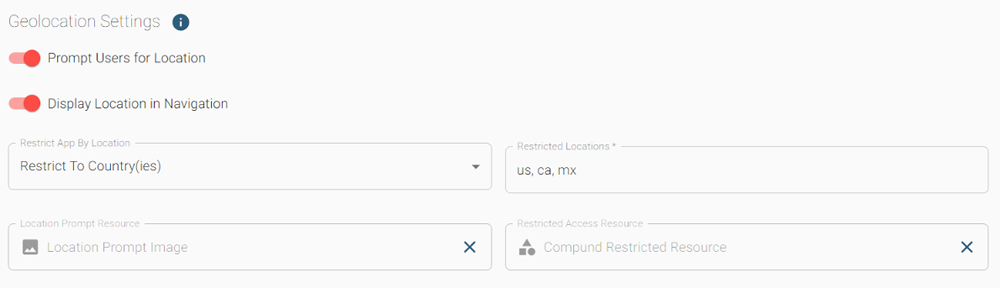
Prompt Users for Location
- Prompts users to enter their location via a pop-up window when the app is accessed.
- You must set the “Restrict App By Location” field to either “Restrict To Country(ies)” or “Restrict To US State(s)” for users to receive this prompt.
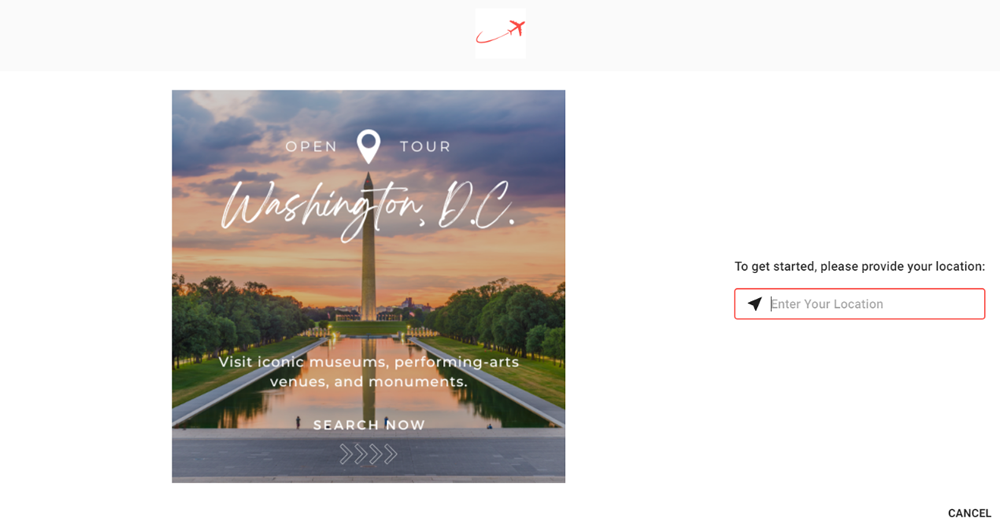
- You can set a “Location Prompt Resource” to display any resource you’d like in the prompt’s pop-up window. Here, we used an image resource:
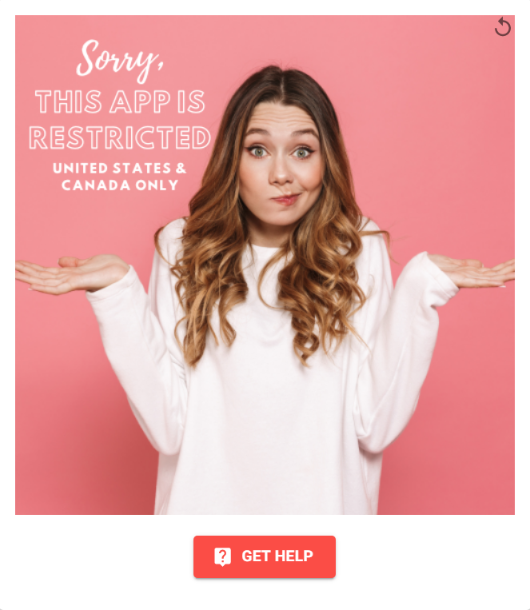
- You can also set a “Restricted Access Resource” to display if a user enters a restricted location. We were more creative in this example and used a compound resource type that combines multiple resources. In this case, we combined an image resource on top with a web URL button on the bottom:
Display Location In Navigation
- Allows users to enter location via the top app bar manually.
- Restricted or unrestricted apps can use this setting.

You’re doing great! The last feature you can implement with this add-on is filtering! Users will appreciate this one, and it’s easy to set up with the Tagging add-on.
Location Tagging
With the Maps and Tagging add-ons enabled, admins can associate tag categories with location components (elements of a location) to filter or group resources by location.
To use this feature, enable “Prompt for Location” in Maps Settings and link the desired location component to the corresponding tag category. Then, add location-based tags to the appropriate resources. This allows the app to use the user’s location to associate resources based on linked tag categories and address components.
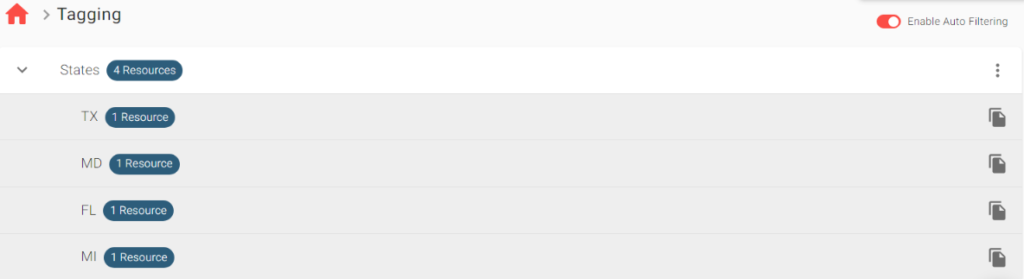
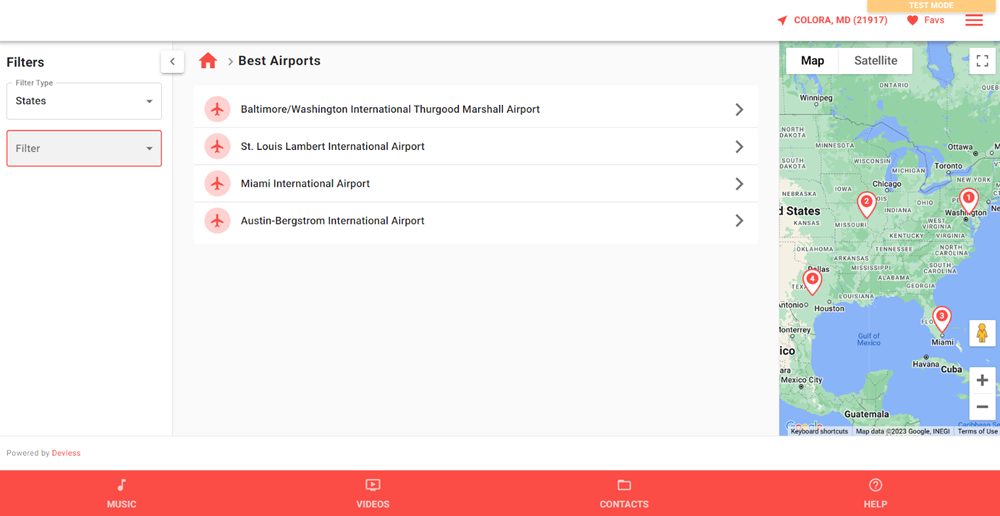
For example, suppose you have an app with a “States” tag category that includes “TX,” “MD,” “FL,” and “MI” as possible tags.
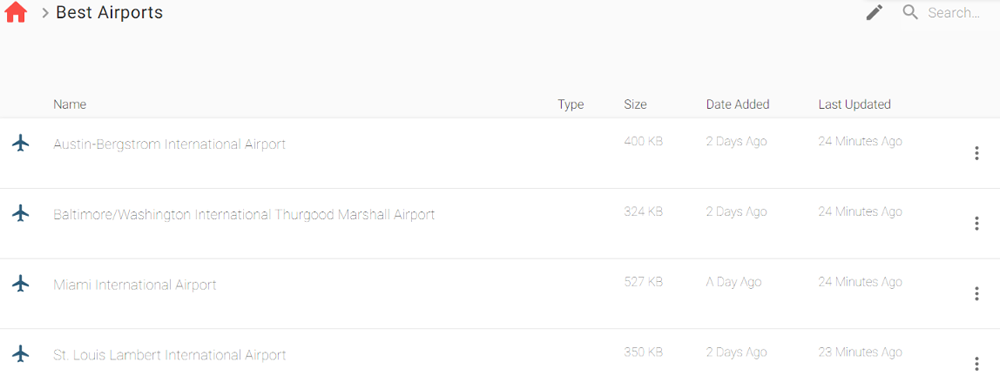
Then you have a folder full of “Best Airports” containing resources from various states, each tagged with the appropriate “State” tag (use the three vertical dots).
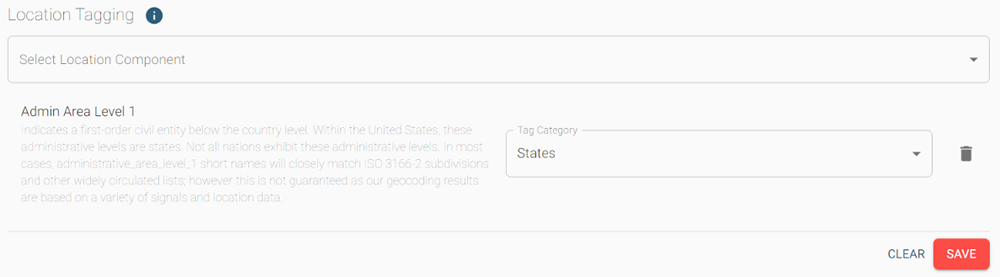
In settings, by enabling “Prompt for Location” and linking the “States” tag category to the “Administrative Area Level 1” location component, your app can leverage the user’s location to display resources based on their associated state tags. This helps users find information relevant to their location and enhances their app experience.
In the app, users will see filters on the left. Feel free to add additional filters to assist users.
Testing the Maps & Geolocation Add-on
We highly recommend testing maps in your app if you’ve implemented filtering or restricted access. This will make sure that your resources are displaying as intended.
Wow, congrats on this big upgrade! Since you’re on a roll, check out our other easy add-ons that can level up your app, all without coding. Visit our Help Center, and we’ll be your guide.

Need Help Getting Started?
Blackburn Labs is a software engineering firm that specializes in Devless support because they built it! If you have questions or simply need support, please feel free to reach out to them